Save
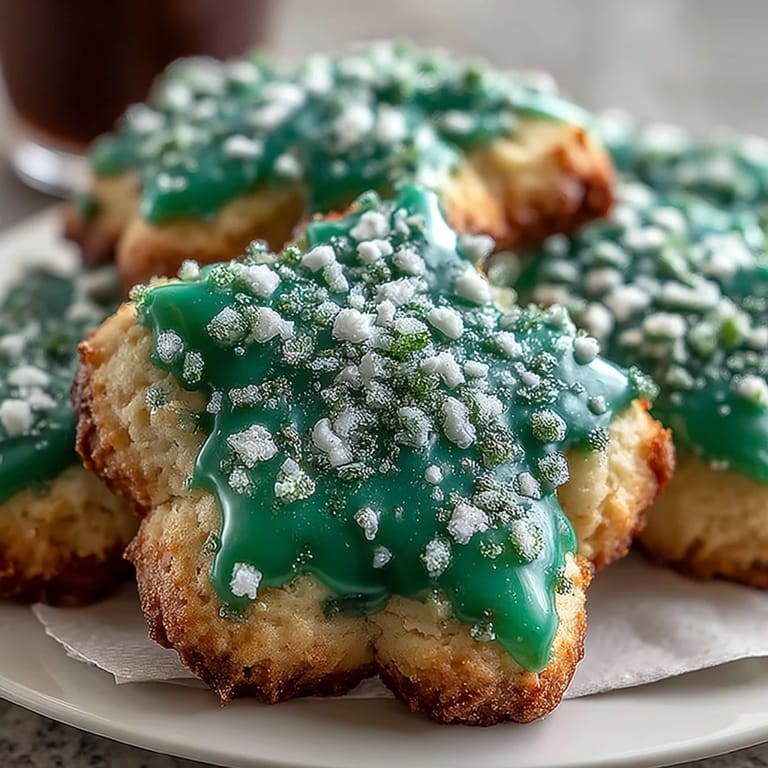
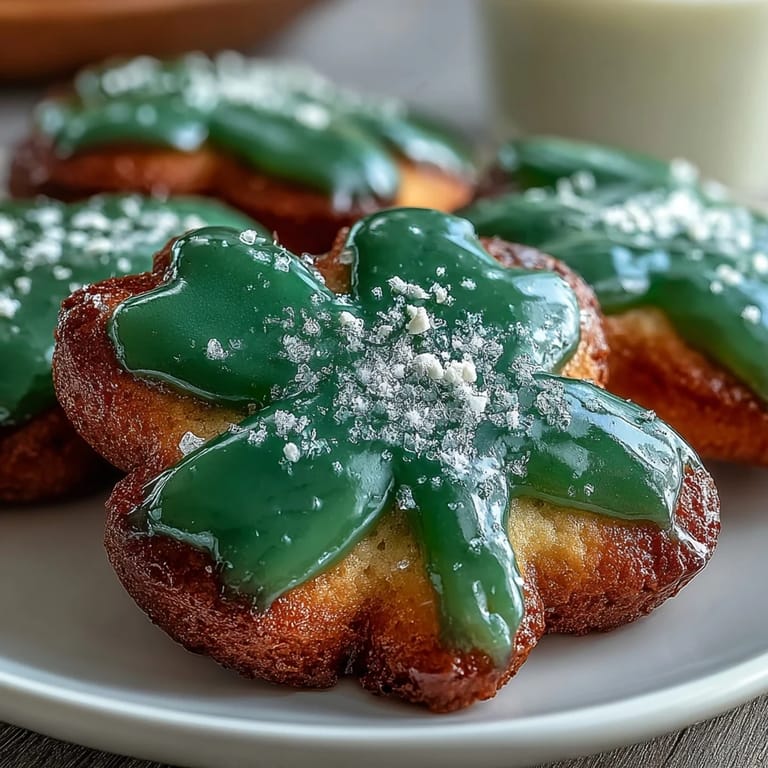
Save My cousin texted me a photo of shamrock cookies she'd made, and I spent the next hour scrolling through my phone instead of working, studying the way the green icing caught the light. There's something about St. Patrick's Day that brings out the baker in me—maybe it's the excuse to use food coloring without apology, or maybe it's just that these little cookies look like you tried harder than you actually did. That evening, I grabbed my mixer and decided to figure out what makes a sugar cookie truly buttery and tender, the kind that doesn't shatter when you bite into it. What I discovered was that patience matters as much as technique, and that green royal icing is honestly more forgiving than it looks.
I made these for my office's St. Patrick's Day potluck, and honestly, I was nervous they'd get lost among all the green beer and corned beef. But when I set out the platter with those vibrant shamrocks, something shifted—people kept coming back, asking for the recipe, and one coworker said they tasted like someone actually cared. That's when I realized this wasn't just about the cookies; it was about giving people something that felt intentional and a little bit celebratory.
Ingredients
- All-purpose flour (2 1/2 cups): The backbone of these cookies, and you'll want to measure it by weight if you can because scooping straight from the bag always packs it down too much.
- Unsalted butter (3/4 cup), softened: Softened means it should yield slightly to your finger without being greasy—room temperature is your friend here.
- Granulated sugar (1 cup): This creams with butter to trap tiny air bubbles, which is literally what makes the cookies tender instead of dense.
- Egg and vanilla extract: The egg binds everything while vanilla whispers in the background—don't skip either one.
- Almond extract (1/2 teaspoon, optional): This one's subtle but if you use it, it adds a warmth that plain vanilla can't quite manage.
- Baking powder and salt: Baking powder helps the cookies spread just enough, and salt amplifies the butter flavor without tasting salty.
- Powdered sugar and meringue powder: Meringue powder is the secret ingredient that keeps royal icing from tasting grainy—it also stabilizes the mixture so it doesn't crack as it dries.
- Green gel food coloring: Gel is better than liquid because it won't thin out your icing, and it gives you a true, vibrant green without needing a gallon of it.
Tired of Takeout? 🥡
Get 10 meals you can make faster than delivery arrives. Seriously.
One email. No spam. Unsubscribe anytime.
Instructions
- Whisk your dry ingredients:
- Combine flour, baking powder, and salt in a bowl and set it aside—this prevents lumps and distributes the leavening evenly throughout your dough.
- Cream butter and sugar:
- Beat them together until they're pale and fluffy, which takes longer than you think it will but it's worth every second. This is where you're building the structure that'll make your cookies tender.
- Mix in your wet ingredients:
- Add the egg, vanilla, and almond extract one at a time, beating after each addition so everything emulsifies properly.
- Bring it together:
- Fold in your dry ingredients gently—overworking at this stage will make tough cookies, and nobody wants that.
- Chill the dough:
- Wrap it in plastic, divide into two discs, and refrigerate for at least an hour so it firms up enough to roll out without sticking everywhere.
- Roll and cut:
- On a lightly floured surface, roll to 1/4-inch thickness and use your shamrock cutter to create little celebrations. Place them an inch apart because they'll spread slightly as they bake.
- Bake with intention:
- At 350°F for 8-10 minutes, you're looking for golden edges while the centers stay pale and slightly soft—they'll continue cooking on the pan for a couple minutes after you pull them out.
- Make your icing:
- Whisk powdered sugar with meringue powder, then gradually add water and vanilla while beating on low speed until it's smooth and glossy, about 5-7 minutes. Add your green gel food coloring and mix until you love the shade.
- Decorate with flair:
- Pipe an outline around each cookie first, then flood the inside with icing using a toothpick to spread it gently. Let it set for at least an hour—your patience here prevents smudges and gives you that beautiful smooth finish.
 Save
Save The moment that matters most happened when my niece decorated her own shamrock cookies with leftover icing, and even though they looked like green chaos, she was so proud that she made everyone at the table try one. That's when I understood these cookies are really about creating a reason to gather and celebrate something as simple as the color green.
The Secret to Tender Sugar Cookies
The difference between a cookie that shatters and one that's slightly chewy comes down to three things: not overmixing your dough after adding flour, pulling your cookies from the oven while the centers are still pale, and resisting the urge to overbake them. I learned this the hard way after making dozens of rock-hard cookies before I realized the problem wasn't my ingredients—it was my timing. Most recipes tell you to bake until golden, but golden is too late for these; you want the edges golden and the centers just barely set.
Why Royal Icing Looks Intimidating (But Isn't)
The first time I made royal icing, I stared at it for five minutes wondering if I'd ruined it because it looked too thick, too grainy, and absolutely not like the smooth finish I'd seen online. Then I kept beating it, and somewhere between minute five and seven, it transformed into something glossy and perfect—which is exactly what meringue powder does when you give it time. The key is patience and a low mixer speed; rushing it or beating it too aggressively won't help, it'll just frustrate you.
Decorating, Storage, and Celebrations
Once your icing sets, these cookies are practically indestructible and they'll stay fresh in an airtight container for a full week, which means you can make them days ahead and not stress. The vibrant green holds up beautifully, and if you want to add edible gold glitter or sprinkles, do it while the icing is still wet—that's when everything sticks. I've found that these cookies travel well too, so they're perfect for bringing to parties, potlucks, or just leaving on someone's desk as a surprise.
- Store in an airtight container at room temperature and they'll stay soft for up to a week.
- If you want to add sprinkles or gold glitter for extra flair, do it while the icing is still wet so everything adheres.
- These freeze beautifully before decorating, so you can make the dough weeks ahead and bake whenever you want.
 Save
Save These shamrock cookies have become my quiet way of saying I care, and every time I make them, I'm reminded that the best recipes are the ones that let you infuse a little personality into something homemade. They're not complicated, but they're memorable, and that's really all that matters.
Saffron Brook Recipe Q&As
- → What gives the icing its vibrant green color?
Green gel food coloring is added to the royal icing to achieve a bright, festive shade perfect for shamrock shapes.
- → How can I make the cookies softer?
Reducing the baking time by about one minute helps keep the cookies softer and more tender.
- → Can almond extract be omitted?
Yes, almond extract is optional and can be left out to suit personal taste or allergies.
- → How long should the icing set before serving?
Allow the icing to set for at least one hour to achieve a firm, glossy finish.
- → What is the best way to store these cookies?
Store in an airtight container at room temperature for up to one week to maintain freshness.